Tuesday, June 19, 2012

NASA Ames Research Center - Week 1

A lot has happened since my last update.  We’ve been so busy here with projects and gatherings that we come back and crash at the hotel before I can work up enough energy to write!  I've been having troubles uploading pictures to this post, which is the reason this update has taken so long, but I'm still working on it!  If anything, I'll provide a link to an online album of the images I would've put on here, because there are some awesome pictures from this past week!


Tuesday we started to work with Michelle Graf, who works in the education department of Goddard Space Flight Center in Maryland.  She is a part of the BEST program…and it’s definitely one of the best things I’ve participated in.  BEST stands for Beginning Engineering, Science, and Technology.  This program is designed to help students work through the use of the engineering design process.  We started off the day with the challenge of making a bug using a hobby motor that would travel by vibrations, much like how your cell phone moves when it vibrates on a table. 


I’ll be honest…my partner and I were horrible at this.  If I had been given the same challenge, but didn’t have to use a motor I would’ve been fine, but that motor aspect threw me off.  But a lot of the other partnerships made some pretty awesome designs!  Then we went on a tour to the AEE (Ames Exploration Encounter).  It’s NASA’s own baby interactive science museum, and it has some pretty cool things.  I got to walk through an old wind tunnel, try on a (kid-sized, but still awesome) NASA jumpsuit, play flight control, spin like Kristi Yamaguchi, and find out how hard it is to plan launches to other areas.


On Wednesday, we got to spend our entire day with Michelle…and what a day it was!  We started off the morning with a design challenge.  We had to build a lunar buggy that we would test.  It had to go down a ramp and travel at least 50cm, had to hold 2 astronauts (cotton balls), and carry some lunar cargo (AA battery).  Now, that’s a lot of information missing…that’s where the Engineering Design Process comes in:

1) ASK:  What do we need to find out in order to solve our problem.
Some of our questions included:
-What is the angle of the ramp?
-What supplies do we have to create our buggy?
-What are the size restrictions?
-Are there any restrictions about securing the cargo or astronauts?
-Does the buggy need to have any steering mechanisms?

2) IMAGINE:  Think outside the box and synergize.  What is illogical and what are some possible good ideas?  This is the time for students to draw things out and test it in their minds.  Michelle told us we weren’t allowed to know what items we had available to build our buggies out of until the next stage because she didn’t want us to limit ourselves based on what we had available.


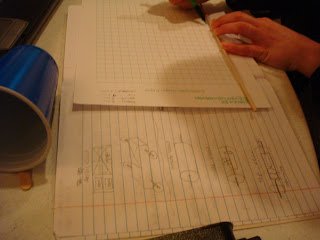
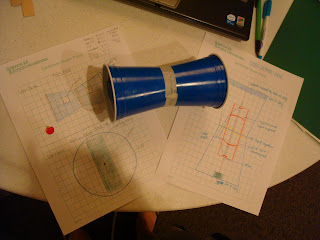
3) PLAN:  Pick an idea that seems the most probable and plan it through design plans using the available supplies.  We had to draw at least three different views.  Most people did a front view, top view, and side view.  However, with the design we planned, a front view and top view would look exactly the same.  Instead we did a top and side view and a cross-section.  We typically tend to rush through this stage because we are overly-excited about getting our hands dirty and actually making something.  But Michelle made us spend an agonizing 25 minutes on this part, because the better our drawing plans are, the more thought out the idea becomes.


4) CREATE:  The fun part! 


5) EXPERIMENT:  Once our buggy was complete we got to test it out on the ramp.  Like with any other experiment, we had to conduct multiple tests and had only one variable.  It was interesting to see all the groups’ designs come to life and see how they performed.


6) IMPROVE:  What steps can you take to make your design function better, and sometimes even look better?

There is a lot more information on the BEST website: http://www.nasa.gov/audience/foreducators/best/


During our testing, our buggy went 410cm, which was much more than the 50cm required!  After everyone tested their buggies, we were hit by some unfortunate news…there was an added part of the challenge!  We were told at that point that we would be dropping our buggies off the stairway of the nearby commissary…about a 25 foot drop!  My partner and I were devastated because we knew that our buggy (that we named Infinity because of the shape of its design) would have extreme difficulties surviving the drop because of its weight.  We were given a budget, but to us it didn’t really matter.  The obvious solution was to create a parachute, but even reinforced grocery bags wouldn’t have held up Infinity.  So my partner and I became very dejected for the 25 minutes we had to go through the engineering design process for this added part of the challenge.  With 5 minutes remaining, we decided to fold some cardboard to make a box, cushion it with 4 grocery bags (which used up our entire “budget”), and put some tape on top so it would fall out when it exploded upon impact.  Imagine our surprise when little Infinity survived the impact and was still able to roll down the ramp more than 50cm!  Of course, it didn’t travel as far as before because there was a slight crack in the side and the bars of clay shifted around to make it roll crookedly…but it rolled!


Thursday we did a few more things with Michelle Graf then took a tour of the Future Flights simulator.  This was basically a facility that deals with the aeronautics aspect of NASA; it was a mock flight control tower that had screens that gave us a digital 360-degree view like they would have at an airport.  They could change the airport, the weather, and even our location within the airport.  Then came the awesome part…we went to Mars!  Using images collected by Mars rovers Spirit and Opportunity, we were able to get a 360 degree view of the landing sites of the rovers.


Friday we made mini rockets that we launched using PVC pipes and empty 2-liter soda bottles.  We tested out how the trajectory angles affected the distance our rockets would travel, and had tons of fun stomping on soda bottles.  Then for the afternoon, we went to a place called RAFT – Resource Area for Teachers.  This place has a teacher work area much like an expanded version we have at our school…die-cuts, laminators, copiers.  But the cool part was the warehouse.  Companies donate supplies in bulk for really awesome experiments and RAFT makes kits for teachers to use to teach math and science concepts in the classroom.  Put a group of teachers and future teachers in there and you basically have a group of kids in a candy shop.  My kids next year are going to have lots of awesome activities to do…and maybe I’ll invite my old babies back for a visit to try some stuff out as well!

Monday, June 11, 2012

Greetings from Ames Research Center!  I am currently participating in NASA's Alumni program from the Pre-Service Teacher Institute, and even though I've only been here one day I've learned lots!

That's me with my head inside one of those cheesy cardboard cutouts at the Visitor Center...a great way to kick off my time here!

But before I got to Ames, I had to take two flights (that left way earlier than I wanted them to) in order to reach San Jose/Mountain View area.  And as someone who had never traveled further west than Lubbock, Texas, I was ready to see things.  I made sure when I booked my flight to get a window seat...and I'm sure glad I did!  The view was gorgeous!


It was interesting to see how quickly things changed, too.  In the first picture below, you see the mountains.  But if you look closely in the top right corner, just beneath the wing, you can see the farming areas start.  I wasn't expecting it to change quite to rapidly, but one second there were mountains, then there was a definitive border, and BAM - agriculture.  In the second picture you can see the border, then all the little plots of land for farming.


These last two pictures were from the Visitor Center at Ames.  It is of SOFIA, which stands for Stratospheric Observatory for Infrared Astronomy.  Basically, it is a plane that they changed the insides so they could fly it around with a chunk missing from the side to stick out a big infrared camera.  The first picture is a model of the plane; you can see the chunk missing from the side with the infrared telescope.  The bottom picture shows a few things.  At the top are two TVs that were videotaping what was in front of them, so you can see me in the pink shirt taking a picture of the display on the left, and a infrered picture of my upper body on the right.  The bottom picture shows Jupiter how we can see it (higly magnified, of course) and how it is seen using infrared technology.


One of our leaders here made a video of what we did yesterday afternoon, which was lots of giggling as we did ice-breaker and get-to-know-you activities.  I'm pretty easy to spot...I'm the tall girl in the blue Dallas Mavs shirt :) 


Thursday, June 7, 2012

I have a lot of travel time awaiting me this summer.  About 11 hours in plane rides, 45 hours in family road trips to visit family (I got out of 15 more hours because of a different trip I'll be on), 10 hours of driving by myself, and 12 hours of driving for a vacation with my friends.  That is a lot of travelling!  The thing is, to me it isn't that much.  Each year we drive to Illinois and back then to Georgia and back to visit family.  During that time I have to find ways to occupy myself.  My sister can read and sleep in the car without any problems, but I get carsick if I try to read and my long legs don't make it easy to get comfortable enough to sleep in the car.  So over the years, I've found something I love to do that keeps me entertained over the journey...PODCASTS!  But not just any podcasts, the best ones I have found are ones made by the awesome people at HowStuffWorks.com.  If you go to iTunes and search "howstuffworks.com" then use the filter on the left to just look at the podcasts, you can see each of the different types they have.  My favorites are the first two: "Stuff You Should Know" and "Stuff You Missed In History Class".  Some of their podcasts are just audio (which works perfectly fine in the car), but they have recently started making audio/video ones. 

Now as a teacher, I heard the question "Can we eat in the classroom?" too many times to remember over the past year.  One of our bilingual teachers was really great about having lunch in the classroom a couple times a week so they could watch videos from the History or Discovery Channel.  As a first year teacher, lunch was my downtime.  I could not see how he was able to relax enough during lunch when he had a class full of kids.  But when we took our district-mandated tests, his kids were always right up at the top with mine, often beating my kids out in math and science.  So towards the end of the year I started thinking of things I could do the next year that would allow me to keep my sanity during a lunch with 21 kids in my classroom.  Then I thought...Podcasts! 

Now just like anything else you use as an outside resource in the classroom, the audio or video podcasts from HowStuffWorks.com should be viewed or heard before being played in the classroom.  They don't really use fowl language, but some of the subjects they talk about are a little more mature than would be appropriate for my 4th graders.  But there is a wide variety of topics that you can choose from, and some of it even covered things that were covered in our curriculum!

Also, myself and some of the other teachers participating in this flight week opportunity are planning on making short video podcasts that can be shared with other educators for use in the classroom.  Since I am going to Ames Research Center on Sunday, I'm hoping to be able to make one within a week or two.  I will definitely be posting that on here as soon as possible, along with pictures of some cool things I see at Ames!

Saturday, June 2, 2012

WOW!  This week has been a crazy week!  Thursday was the last day of school for my kiddos, and saying goodbye to them was so difficult.  I'm really going to miss all 21 of my babies this summer!  Thursday afternoon we had another video conference with our team for the Vomit Comet.  We discussed a little more about the experiements we will be doing. (That's me on the bottom...second from the left)  Also, please ignore the awkward white space around the pictures.  I wanted to get these up quickly, and later on will hopefully find out how to make them go away.


Friday was a work day for the teachers, which basically means we have to clean up a year's worth of school mess and move everything out of the way so the custodians can wax the floors.  In the morning, however, NASA set up a great DLN (Digital Learning Network) for us.  Those of us with kids still in school got to share that opportunity with students.  Even without students, though, it was fun.  And now, some pictures:

This is the guy that lead our DLN.  He answered all our questions and got us some cool pictures and videos to watch.  (Quick message for Piep's Peeps: 8 or 9)

In this picture, you can see the people in microgravity on the Vomit Comet.  In the lower left corner is a picture of what the plane is doing at that point in the flight.  That's angled pretty far down....

Going up!
Going down!

A flame in Earth gravity conditions
A flame in microgravity

This next part is something my kiddos should love.  After our state tests, we made film canister rockets with water and Alka Seltzer tablets.  Well in these next few pictures, they got a ball of water (because with microgravity, water just floats in a blob) a little bit bigger than the Alka Seltzer tablet they added and this is what happened:

All in all, I'd call it a successful few days!